

Are you sick and tired of checking your Arduino project for updates all the time? Do you want to improve the accuracy and efficiency of your code? then you have to get familiar with Arduino interrupts!
A special signal called an interrupt guides the Arduino microcontroller to halt what it is doing and respond to an event. The use of interrupts allows you to react quickly to outside events like button presses or sensor readings without constantly checking for change.
We’ll focus specifically on Arduino interrupts in this article. Several interrupt pins on the Uno can be used for initiating interrupt processes. We’ll look at the various interrupt options, how to use them, and examples of their application in actual projects.
In order to advance your Arduino projects and increase their effectiveness and precision, read on to discover more about interrupts in the Arduino Uno!
Have you experienced a video game that lags or freezes when there are too many things going on at once?

This is a result of the game’s insufficient processing requirements to update the display and check for changes all the time.
Similar to this, Arduino interrupts enable the microcontroller to react to outside events without frequently checking for changes.
Introduction to Arduino Interrupts
Have there ever been times when you were playing a video game when you got a call notification? You can see the call on your phone while the game simply pauses.

This functions similarly to how Arduino interrupts do. The microcontroller stops what it’s doing when an interrupt signal is received and handles the event, just like your game stops and shows you an incoming call.
other Applications for this in daily life include smart home systems that turn on the lights when a door is opened.
An interrupt signal that instructs the microcontroller to halt what it is doing and turn on the lights is sent when the door is opened. As a result, the system is more able to respond quickly and effectively to outside events.
Several interrupt pins on Arduino microcontrollers can be used to start interrupt procedures.
When responding to external events, such as button presses or sensor readings, interrupts can be used to avoid continuously polling for changes.
Pin change interrupts and external interrupts are the two main categories of interrupts in Arduino.
- External Interrupts
- Pin Change Interrupts
Additionally “reset” is also considered an interrupt.
External Interrupts
- External events, like a change in the voltage on an interrupt pin, can cause external interrupts to occur.
- Digital pins 2 and 3 are the two external interrupt pins on the Arduino Uno.
- External interrupts can be set to activate on the pin’s rising edge, falling edge, or state change.

How to use Interrupts on Arduino Uno
Two hardware interrupt pins, digital pins 2 and 3, are present on the Arduino Uno.
Atmega328p is the microcontroller inside the arduino uno. You can recognize the different types of Arduino interrupts if we think about the datasheet for the atmega328p. However, it is not necessary for you to be aware of everything at once.
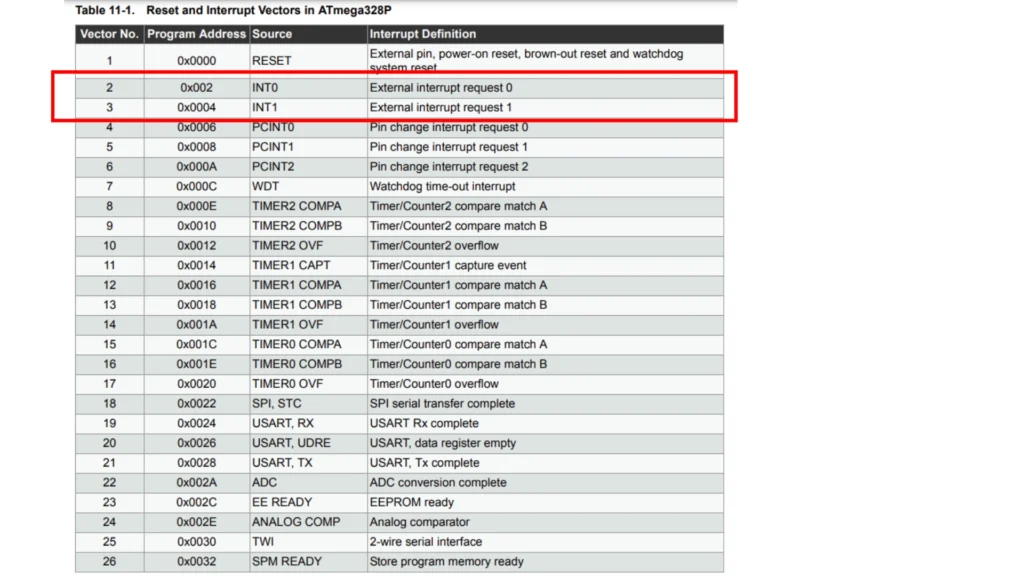
let’s focus on these main External interrupt pins

The pin you want to use must have an interrupt handler function attached in order to use interrupts with the Arduino Uno.
Every time an interrupt is triggered, the interrupt handler function( a special function)is called.
Examples of Using Interrupts on Arduino Uno
The Arduino Uno can detect a button press as an example of how to use interrupts. An action by the microcontroller, such as turning on an LED, is possible when the interrupt handler function is called when the button is pressed.
First, we must code the standard elements, like defining variables, etc.
int ledPin = 13;
int interruptPin = 2;
then the usual setup section
void setup() {
  // Initialize the LED pin as an output
  pinMode(ledPin, OUTPUT);
  // Initialize the interrupt pin as an input
  pinMode(interruptPin, INPUT_PULLUP);
  // Attach the interrupt to the interrupt pin
  attachInterrupt(digitalPinToInterrupt(interruptPin), blink, FALLING);
}
we use a special function “attachInterrupt( [interruption] , [sub routine name] , [triggering method])” and inside this function, there is a subfunction.
“digitalPinToInterrupt([interruptPin])“is an Arduino interrupt function that associates an interrupt number with a digital pin so that an interrupt service routine (ISR) can be attached to the pin.
then we have the loop section
void loop() {
  // Do nothing in the main loop
}
there is nothing to execute in the loop.
Finally, we have an arduino interrupts service routine (ISR).
void blink() {
  // Turn on the LED
  digitalWrite(ledPin, HIGH);
  // Wait for 500 milliseconds
  delay(500);
  // Turn off the LED
  digitalWrite(ledPin, LOW);
  // Wait for another 500 milliseconds
  delay(500);
}
these are some examples of using external arduino interrupts
- to keep track of sensor input, like a motion sensor, to cause an alarm or notification.
- monitoring speed or position by counting the number of rotations made by a wheel or motor.
- the precise timing of an event, such as determining a pulse’s duration or a signal’s timing.
- By switching the microcontroller to a low-power mode and waking it up when an external event happens, power can be saved.
- the development of a “wake-up” feature for a project that must be in sleep mode but must awaken when a certain event occurs.
Advantages of Using Arduino Interrupts
Since the microcontroller only needs to complete a task when an event occurs, using interrupts can reduce processing time and increase efficiency.
Due to their quicker response times than polling, interruptions can also increase accuracy and decrease errors.
additionally, we have pin change interrupts. Pin change arduino interrupts in Arduino programming are interrupts that are triggered by a change in the state of a particular pin as opposed to the more frequently used external interrupts, which are connected to specific interrupt pins.
The pin change interrupt, which provides more flexible interrupt options, is useful for a variety of projects.
let’s talk about this kind of interruption from another article.
visit to arduino forum.
Summary
Programming Arduino microcontrollers with interrupts give you a strong tool for making them react quickly and effectively to outside events. External, pin change and reset are the three main arduino interrupt types. There are 2 pins (2,3) on the Arduino Uno board for external interrupt. Code for an interrupt routine must be written. By learning how arduino interrupts function and how to use them, we can use their Arduinos to build more complex and sophisticated projects.