

A real-time operating system (RTOS) is a piece of software that controls how a computer system uses its resources. It provides that the necessary tasks are completed on time. Several gadgets like smartphones, tablets, and embedded systems, use RTOSes.
FreeRTOS is a free version of a real-time operating system (RTOS). It is distributed under the liberal MIT license, enabling users to utilize, modify, and distribute the software freely and without limitations. However, it’s important to note that there may be additional features available in certain RTOS implementations compared to FreeRTOS.
An RTOS (real-time operating system) is essentially an operating system that runs on microcontrollers. It is used when there is a need for multi-threading, which requires accessing multiple cores in parallel. As a result, the RTOS operating system becomes necessary. It is a C-based operating system and can be challenging to write code that accesses each core in parallel. However, RTOS comes with inbuilt libraries and functions that help speed up and simplify the process.
In this article, we provide you with basic FreeRTOS codes for use in ESP32. When it comes to coding for ESP32, there are some differences compared to other platforms. We utilize a modified version of FreeRTOS specifically tailored /
This is the content table (click the topic to jump)
topic list:
- Structure
- Multi-threading
- delay function
- Queue
- interrupt service routine (ISR)
- Task manager
- summery and behind the scene
Structure
In FreeRTOS, the setup involves creating tasks, task handlers, and the task execution part. Unlike the traditional super loop coding architecture commonly used in Arduino programming, FreeRTOS employs a task-based architecture. This is the key distinction between regular C/C++ coding and FreeRTOS.
To implement FreeRTOS,
we begin by assigning names to our tasks using task handlers.
Next, we define the structure of our tasks, which follows a predefined format.
Finally, we run the tasks within the setup section.
Theoretically, the ESP32 can support up to 32 tasks simultaneously.
#include <Arduino.h>
#include <freertos/FreeRTOS.h>
#include <freertos/task.h>

// Task handlers/////////////////////////////////////////////////////////
TaskHandle_t task1Handle;
TaskHandle_t task2Handle;

/////////////////////////////////////////////////////////////////////////
// Task function for Task 1
void task1(void *parameter) {
  while (true) {
    Serial.println("Task 1 is running");
    delay(1000);
  }
}

// Task function for Task 2
void task2(void *parameter) {
  while (true) {
    Serial.println("Task 2 is running");
    delay(2000);
  }
}

//////////////////////////////////////////////////////////////////////
void setup() {
  Serial.begin(115200);

  // Create Task 1 with task handler
  xTaskCreate(task1, "Task 1", 10000, NULL, 1, &task1Handle);

  // Create Task 2 with task handler
  xTaskCreate(task2, "Task 2", 10000, NULL, 1, &task2Handle);
}

////////////////////////////////////////////////////////////////////
void loop() {
  // Empty loop
}
You can change a number of settings by changing the value on this line, including the task priority and running core:
xTaskCreatePinnedToCore(
  serversend,           // Task function
  "serversend",         // Task name
  2048,                 // Stack size
  NULL,                 // Task parameter
  10,                   // Task priority
  &serversendHandle,    // Task handle
  1                     // Run on core 2
);
Multi-threading
You have the ability to create multiple tasks and run them on various cores. For the ESP32, there are two cores. (core 0, core 1) You are able to perform the following when you give the code with providing these cores numbers.
#include <Arduino.h>
#include <freertos/FreeRTOS.h>
#include <freertos/task.h>

// Task handlers/////////////////////////////////////////////////////////
TaskHandle_t task1Handle;
TaskHandle_t task2Handle;

/////////////////////////////////////////////////////////////////////////
// Task function for Task 1
void task1(void *parameter) {
while (true) {
int randomNumber = random(100);
Serial.print("Random number in Task 1: ");
Serial.println(randomNumber);
delay(1000);
}
}

// Task function for Task 2
void task2(void *parameter) {
while (true) {
Serial.println("circuitprofessor.com");
delay(2000);
}
}

//////////////////////////////////////////////////////////////////////
void setup() {
Serial.begin(115200);

// Create Task 1 with task handler
xTaskCreate(task1, "Task 1", 10000, NULL, 0, &task1Handle);

// Create Task 2 with task handler
xTaskCreate(task2, "Task 2", 10000, NULL, 1, &task2Handle);
}

////////////////////////////////////////////////////////////////////
void loop() {
// Empty loop
}delay function
The ‘delay()’ function is typically used in Arduino. But in this instance, we use the ‘vTaskDelay()’ function. The primary distinction is that when we employ “delay(),” the whole process remains on hold for a specific amount of time. But if we take ‘vTaskDelay()’ into account, it only affects the execution of the particular job it is called within.
#include <Arduino.h>
#include <freertos/FreeRTOS.h>
#include <freertos/task.h>

// Task handlers/////////////////////////////////////////////////////////
TaskHandle_t task1Handle;
TaskHandle_t task2Handle;

/////////////////////////////////////////////////////////////////////////
// Task function for Task 1
void task1(void *parameter) {
while (true) {
int randomNumber = random(100);
Serial.print("Random number in Task 1: ");
Serial.println(randomNumber);
vTaskDelay(500);
}
}

// Task function for Task 2
void task2(void *parameter) {
while (true) {
Serial.println("circuitprofessor.com");
vTaskDelay(500);
}
}

//////////////////////////////////////////////////////////////////////
void setup() {
Serial.begin(115200);

// Create Task 1 with task handler
xTaskCreate(task1, "Task 1", 10000, NULL, 0, &task1Handle);

// Create Task 2 with task handler
xTaskCreate(task2, "Task 2", 10000, NULL, 1, &task2Handle);
}

////////////////////////////////////////////////////////////////////
void loop() {
// Empty loop
}Queue
In many situations, the queue function is helpful. It is a good idea to use a queue if you need to send values from one task to another. Using queues, tasks across multiple cores can communicate with one another and exchange values. To communicate values from one task to another one, you can use a global variable. With this technique, you would give the global variable a value in one task, and then read it in the other task.
#include <Arduino.h>
#include <freertos/FreeRTOS.h>
#include <freertos/task.h>
#include <freertos/queue.h>
#include <esp_system.h>

// Task handlers/////////////////////////////////////////////////////////
TaskHandle_t task1Handle;
TaskHandle_t task2Handle;

// Queue handler/////////////////////////////////////////////////////////
QueueHandle_t sendingValue = xQueueCreate(1, sizeof(int));

/////////////////////////////////////////////////////////////////////////
// Task function for Task 1
void task1(void *parameter) {
  while (true) {
    int randomNumber = random(100);
    Serial.print("Random number in Task 1: ");
    Serial.println(randomNumber);
     xQueueSend(sendingValue, &randomNumber, portMAX_DELAY);
      vTaskDelay(pdMS_TO_TICKS(10));
      xQueueReset(sendingValue);

    vTaskDelay(500);  // Delay for 500 milliseconds
  }
}
// Task function for Task 2
void task2(void *parameter) {


  while (true) {

     int num;
     xQueueReceive(sendingValue, &num, portMAX_DELAY);
     Serial.println(num);
    vTaskDelay(500);  // Delay for 500 milliseconds

  }
}
QueueHandle_t is a data type used to create a variable that serves as a handle for the queue. this variable functions as a bridge that grants access to communication between two tasks. Similar to the name of a bridge that connects different cities.
in this case, the bridge name is “sendingValue”.
QueueHandle_t sendingValue = xQueueCreate(1, sizeof(int));xQueueCreate(1, sizeof(int)); define the size of the Queue .in this case the sending value has one int-size data space.
vTaskDelay(pdMS_TO_TICKS(10));pdMS_TO_TICKS(10) turns 10 milliseconds into the equivalent FreeRTOS tick count, the operating system’s default measure of time.
xQueueReset()In order to reset a queue and remove all of its components, use the procedure xQueueReset().
interrupt service routine (ISR)
An interrupt is a technique in which the program’s normal execution is temporarily interrupted and the interrupt service routine (ISR) is run according to a specified input signal. The ISR is finished, and then the program begins its regular working process. read full details about the interrupt
The interrupt service routine (ISR) must be defined in your code before anything else when dealing with interrupts. The ISR outlines what should be done after receiving an interrupt signal.
Let’s examine a sample code that demonstrates how to blink an LED based on an interrupt signal.
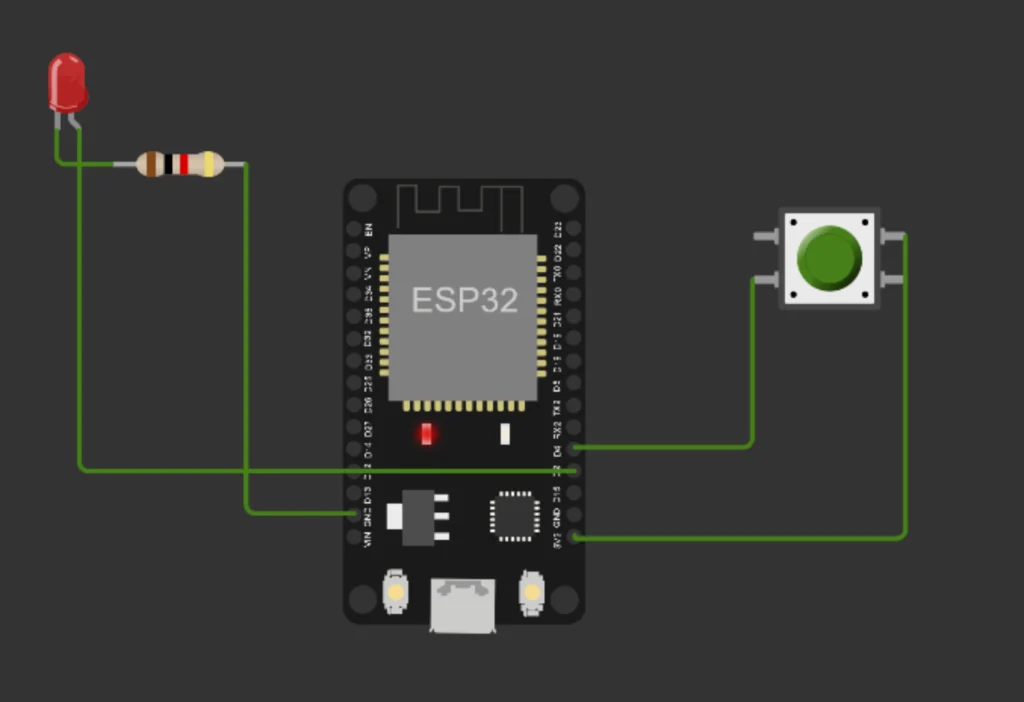
visit to simulate …
#include <Arduino.h>
#include <driver/gpio.h>

#define ESP_INTR_FLAG_DEFAULT 0
#define BUTTON_PIN GPIO_NUM_4
#define LED_PIN GPIO_NUM_2

TaskHandle_t ISR = NULL;
bool led_status = false;

void IRAM_ATTR button_isr_handler(void *arg)
{
  xTaskResumeFromISR(ISR);
}

void button_task(void *arg)
{
  while (true)
  {
    vTaskSuspend(NULL);
    led_status = !led_status;
    gpio_set_level(LED_PIN, led_status);
  }
}

void setup()
{
  gpio_pad_select_gpio(LED_PIN);
  gpio_pad_select_gpio(BUTTON_PIN);

  gpio_set_direction(LED_PIN, GPIO_MODE_OUTPUT);
  gpio_set_direction(BUTTON_PIN, GPIO_MODE_INPUT);

  // SET INTERRUPT -- FALLING EDGE TRIGGERING
  gpio_set_intr_type(BUTTON_PIN, GPIO_INTR_NEGEDGE);

  // DEFINE DEFAULT CONFIGURATION
  gpio_install_isr_service(ESP_INTR_FLAG_DEFAULT);

  // ATTACH INTERRUPT SERVICE ROUTINE
  gpio_isr_handler_add(BUTTON_PIN, button_isr_handler, NULL);

  xTaskCreate(
      button_task,
      "button_task",
      4096,
      NULL,
      10,
      &ISR);
}

void loop()
{
  // Your main code here
}
let’s break down key points of this code
TaskHandle_t ISR = NULL;
bool led_status = false;
Global variables are declared in these lines. The interrupt service routine (ISR) uses the task handle TaskHandle_t ISR. The LED state is tracked via the bool led_status variable.
void IRAM_ATTR button_isr_handler(void *arg)
{
  xTaskResumeFromISR(ISR);
}
The button’s interrupt service routine (ISR) is handled by the button_isr_handler function in this snippet of code. An interrupt signal from a hardware source, in this example the button press, causes a special function called an ISR to be called.
The processor jumps to run the ISR code as soon as the button is pressed which causes an interrupt.
The button_isr_handler function is put in the IRAM (Internal RAM) region by specifying it with the IRAM_ATTR attribute.
The storage of ISR functions in a quick and interrupt-safe memory space allows for their fast and efficient execution.
The line xTaskResumeFromISR(ISR) is located inside the button_isr_handler function. This line is responsible for resuming up where the task left off when the button interrupt happened.
In this instance, it resumes the button_task function, which controls the LED’s state.
The job is restarted from the ISR context by utilizing the xTaskResumeFromISR function. This indicates that there will be no delay put on by the ISR and that the LED toggling operation can begin immediately after the button is pressed.
The task resumes execution where it left off, enabling the LED status to be updated appropriately.
When a button interrupt happens, the button_isr_handler function is activated.
An ISR is in control of handling the interrupt and continuing the button_task function’s operation, which manages the LED. This mechanism makes sure that the LED may be switched on and off quickly after pressing the button, with no noticeable delay.
void button_task(void *arg)
{
  while (true)
  {
    vTaskSuspend(NULL);
    led_status = !led_status;
    gpio_set_level(LED_PIN, led_status);
  }
}
A button interrupt activates the button_isr_handler function. The button_task function, which manages the LED, is handled by an ISR which also takes over the execution of the interrupt. With the use of this mechanism, the LED can be switched on and off without any discernible delay in response to pressing the button.
void setup()
{
  gpio_pad_select_gpio(LED_PIN);
  gpio_pad_select_gpio(BUTTON_PIN);

  gpio_set_direction(LED_PIN, GPIO_MODE_OUTPUT);
  gpio_set_direction(BUTTON_PIN, GPIO_MODE_INPUT);

  // SET INTERRUPT -- FALLING EDGE TRIGGERING
  gpio_set_intr_type(BUTTON_PIN, GPIO_INTR_NEGEDGE);

  // DEFINE DEFAULT CONFIGURATION
  gpio_install_isr_service(ESP_INTR_FLAG_DEFAULT);

  // ATTACH INTERRUPT SERVICE ROUTINE
  gpio_isr_handler_add(BUTTON_PIN, button_isr_handler, NULL);

  xTaskCreate(
      button_task,
      "button_task",
      4096,
      NULL,
      10,
      &ISR);
}
The setup function, which is called just once at the start of the program, is this one. By choosing them using gpio_pad_select_gpio(), it configures the GPIO pins that are utilized for the LED and button.
Using gpio_set_direction(), the button pin’s direction is set to input while the LED pins is output.
Using gpio_set_intr_type(), the interrupt type that triggers falling edges is set for the button.
The gpio_install_isr_service() function installs the interrupt configuration by default.
Finally, using gpio_isr_handler_add(), the interrupt service procedure (button_isr_handler()) is connected to the button pin.
In order to construct the task that executes the button_task() method, the xTaskCreate() function is also used.
Task manager
FreeRTOS has a task management function, similar to how most operating systems allow you to view and control the processes that are now running on your computer.
You can keep track of and manage the tasks in your embedded system with the help of the task manager provided by FreeRTOS. The task manager gives you information about the tasks that are currently active in your FreeRTOS program, enabling you to get information like task names, execution status, stack utilization, and other pertinent details.
there are multiple task manager functions in FreeRTOS
Task state
we can print out the state of the task.
//https://circuitprofessor.com/
#include <FreeRTOS.h>

TaskHandle_t Task1Handle = NULL;
TaskHandle_t Task2Handle = NULL;

void Task1(void *parameter)
{
  int count = 0;
  while(1)
  {
    count++;
    vTaskDelay(50);
  }
}

void task2(void *parameter)
{
  while(1)
  {
    eTaskState State_task;
    State_task = eTaskGetState(Task1Handle);
    Serial.print("state of the task 1= ");
    Serial.println((int)State_task);
    vTaskDelay(500);

  }
}

void setup()
{
  Serial.begin(115200);
  xTaskCreate(Task1, "Task 1", 10000, NULL, 0, &Task1Handle);
  xTaskCreate(task2, "Task 2", 10000, NULL, 0, &Task2Handle);
}

void loop() {}
according to this code, our output look like this.
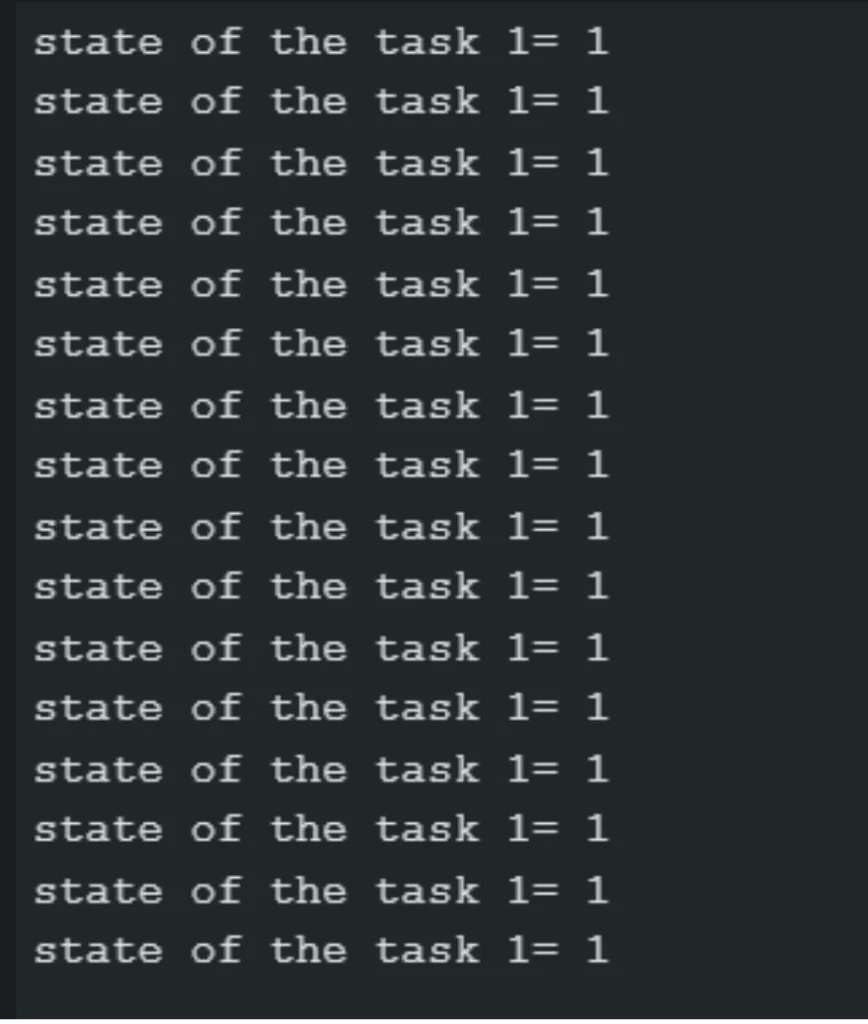
“1” indicate that our task is currently running. according to the task.h library we can find out the all states of the task
The various task state categories in FreeRTOS are as follows:
eRunning: The task is active at this time. = 1
eReady: The job is prepared to start but is not doing so right now because another task with a higher priority is executing.
eBlocked: The task is stopped while it awaits an event.
eSuspended: The task has been put on hold and won’t start up again until it is restarted.
eDeleted : The task’s TCB (task control block) has been erased, but it has not yet been released.
modified task state code
//https://circuitprofessor.com/
#include <FreeRTOS.h>

TaskHandle_t Task1Handle = NULL;
TaskHandle_t Task2Handle = NULL;

void Task1(void *parameter)
{

   //vTaskSuspend(Task1Handle) //uncomment this and play with this
  int count = 0;
  while(1)
  {
    count++;
    //Serial.println(" .");
    vTaskDelay(50);
  }
}

void task2(void *parameter)
{
  while(1)
  {
    eTaskState State_task;
     State_task = eTaskGetState(Task1Handle);


    // Check the state of the current task.
if ( State_task == eRunning )
{
  Serial.println("The current task is running. ");
}
else if ( State_task == eReady )
{
  Serial.println("The current task is ready to run. ");
}
else if ( State_task == eBlocked )
{
  Serial.println("The current task is blocked. ");
}
else if ( State_task == eSuspended )
{
  Serial.println("The current task is suspended. ");
}
else if ( State_task == eDeleted )
{
  Serial.println("The current task is deleted. ");
}

 //State_task = eTaskGetState(Task2Handle);//play with this

   // Check the state of the current task.
// if ( State_task == eRunning )
// {
//   Serial.println("The current task is running. ");
// }
// else if ( State_task == eReady )
// {
//   Serial.println("The current task is ready to run. ");
// }
// else if ( State_task == eBlocked )
// {
//   Serial.println("The current task is blocked. ");
// }
// else if ( State_task == eSuspended )
// {
//   Serial.println("The current task is suspended. ");
// }
// else if ( State_task == eDeleted )
// {
//   Serial.println("The current task is deleted. ");
// }


    // Serial.print("state of the task 1= ");
    // Serial.println((int)State_task);
    vTaskDelay(500);

  }
}

void setup()
{
  Serial.begin(115200);
  xTaskCreate(Task1, "Task 1", 10000, NULL, 10, &Task1Handle);
  xTaskCreate(task2, "Task 2", 10000, NULL, 1, &Task2Handle);
}

void loop() {}
you can play with this code to find the state of the task.
Task list
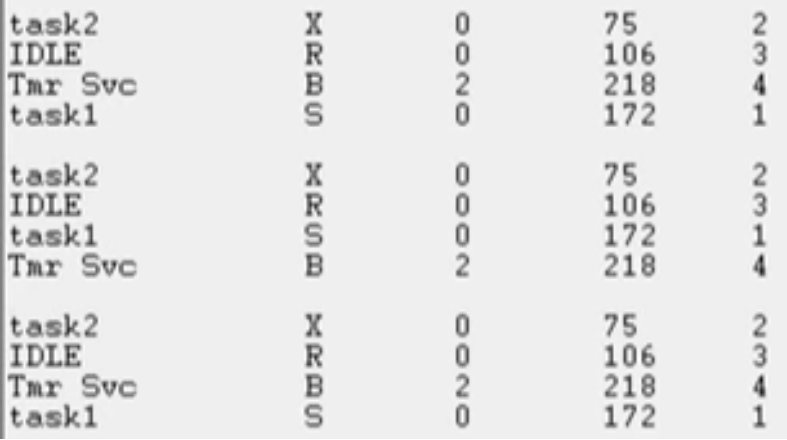
lets move in to little bit advance function which is called vTaskList().
// https://circuitprofessor.com/

#include <FreeRTOS.h>
#include <task.h>

TaskHandle_t Task1Handle = NULL;
TaskHandle_t Task2Handle = NULL;

char myTasks[400];

void Task1(void *parameter)
{
  int count = 0;
  while (1)
  {
    count++;
    vTaskDelay(pdMS_TO_TICKS(50));
  }
}

void task2(void *parameter)
{
  while (1)
  {
    eTaskState State_task;
    vTaskList(myTasks);
    Serial.println(myTasks);


    vTaskDelay(pdMS_TO_TICKS(500));
  }
}

void setup()
{
  Serial.begin(115200);

  xTaskCreate(Task1, "Task 1", 10000, NULL, 0, &Task1Handle);
  xTaskCreate(task2, "Task 2", 10000, NULL, 0, &Task2Handle);
}

void loop() {}
your output will be looks like this
Summary and Behind the scene
Understanding the structure is crucial for FreeRTOS programming because it establishes the framework for how tasks (small units of work) interact within the system.
It’s crucial to understand that true parallel processing is uncommon when we discuss performing activities in parallel on several cores. The system’s “brain,” or FreeRTOS kernel, switches between the processing cores often. It has an impact on how tasks are carried out.
Tasks can be stopped and started again depending on their priority thanks to the advanced scheduling method used by FreeRTOS. Dynamically controlling task execution, the kernel ensures that each task receives equal attention and that system resources are utilized effectively.
In FreeRTOS, tasks work together, which implies that when their allowed time has expired or a delay has occurred, they voluntarily return control to the kernel. The kernel then selects the job to run next depending on criteria such as priority.
FreeRTOS uses a process known as task switching to create parallelism or effective multitasking. This signifies that the kernel starts a new task after briefly pausing another job and saving its progress. As a result of the fast switching, it appears as though multiple jobs are active at once.
The core of FreeRTOS is the kernel, which manages crucial operations including resource allocation (managing shared resources), task scheduling (determining which tasks execute when), and context switching (moving between tasks). FreeRTOS enhances system performance and responsiveness while guaranteeing that tasks are addressed equitably by carefully managing tasks on various cores.
Having an understanding of these ideas is useful for creating programs that are effective at handling many jobs. FreeRTOS offers strong capabilities for task management, enabling programmers to make responsive and multitasking programs.
read more about esp32
Hello, you used to write great, but the last few posts have been kinda boring?I miss your great writings. Past several posts are just a little bit out of track! come on!
Thank you for your sharing. I am worried that I lack creative ideas. It is your article that makes me full of hope. Thank you. But, I have a question, can you help me?